RE 1: Hello World
Hello World,
The following tutorials will be laid out like this: two screenshots, the first being the C source code we are reversing, and the second being the disassembly from IDA Free. I will then walk you through the most important parts of each disassembled assembly code, so you can begin to understand how it works!
These articles are designed for someone who is very new to assembly but not new to programming, you should be comfortable with concepts like variables and functions. It also assumes you have a basic awareness that assembly exists, though you don’t need to understand it.
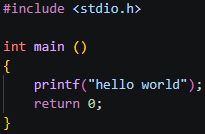
Code:
IDA:
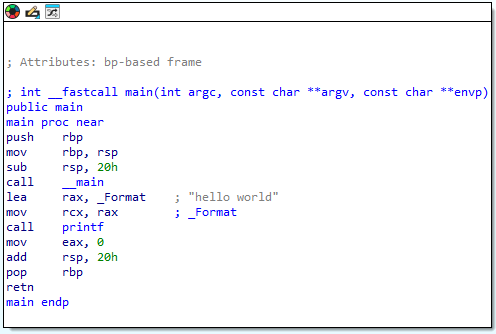
Here we have a basic hello world program. I won’t go too deep on everything here as we will cover each item in more depth in future articles, but let’s cover some of the fundamentals first.
The Stack The stack is a region of memory your program uses to store temporary data. It grows downward, from high addresses toward low addresses:
high addresses   0xFFFF0020  ← stack starts up here
                 0xFFFF0018
                 0xFFFF0010
                 0xFFFF0008
low addresses    0xFFFF0000  ← stack grows toward here
When something is pushed onto the stack, the stack pointer moves down toward lower addresses.
Stack Frame A stack frame is a chunk of the stack reserved for a single function call. It holds that function’s local variables, saved registers, and return address. Each function gets its own frame, and when the function returns, that frame is torn down.
Prologue The prologue is the setup code that runs at the start of every function, to set up the stack frame. You can see it here:
push rbp        ; save the caller's base pointer
mov  rbp, rsp   ; set our base pointer to current stack top
sub  rsp, 30h   ; allocate 48 bytes of stack space for this function
call __main     ; CRT initialisation
push rbp saves the previous frame’s base pointer so we can restore it later. mov rbp, rsp establishes our new frame. sub rsp, 30h carves out space on the stack for local variables by moving the stack pointer down by 48 bytes.
If you wish to go deeper on this, I recommend you watch this video: https://www.youtube.com/watch?v=Cjx5C2I3UrA
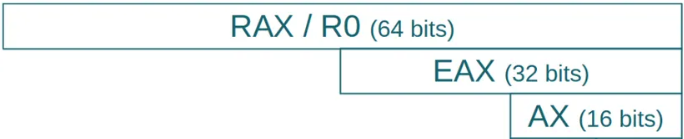
A note on registers Also important to understand throughout this tutorial, you will see references to RAX, EAX and AX. These are all the same register, just different sized portions of it:
RAX = 64 bits (the full register)
EAX = 32 bits (the lower half)
AX  = 16 bits (the lower quarter)
This applies to all registers, for example RDX, EDX and DX are all the same register just accessed at different sizes. The CPU uses the smaller versions when it only needs to work with smaller values, for example a damage value of 25 fits comfortably in 32 bits (EDX) so there is no need to use the full 64 bit RDX.
Flags
Along with registers we also have a useful set of flags which are set after certain instructions such as cmp and test. The most common flags are:
- ZF (Zero Flag) - set to 1 if the result of an operation was zero
- SF (Sign Flag) - set to 1 if the result was negative
These flags are then read by conditional jump instructions to decide whether to jump or not:
jz— jump if ZF = 1 (result was zero)jnz— jump if ZF = 0 (result was not zero)jg— jump if result was greater than zero
For example after a cmp eax, 50 instruction, the CPU subtracts 50 from eax and sets the flags based on the result, it doesn’t store the result anywhere, it just uses the flags to inform the next conditional jump instruction. This will make more sense when we run through some examples in future lessons.
Side note:
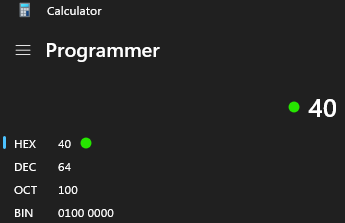
To convert any values for example ‘40h’, open up your windows calculator, select hex, and enter the number! (remember that h is added in IDA free to indicate its hex, so don’t include that!)